Creating and using an SSH key pair
For some reason, I've struggled in the past with creating an SSH key pair and adding it to an online service like Github. This walkthrough focuses on just that for Github on Windows, but the process for other services or on another OS is quite similar.
What is SSH?
SSH is a protocol for secure network communication, based on the principle of public-key cryptography. I like the analogy of one of my lecturers who said we need to see it as an unlimited stash of locks (= public keys). And we can provide any service with one of our locks and ask them to install it on their entrance door. We can then enter at any given time by using our (private) key.
So we'll now add a lock to Github and use our key to open the (virtual) door. This will prevent us from having to authenticate with our username and password every time we push, pull or otherwise interact with Github.
Requirements
- Windows 10
- OpenSSH installed and activated. This should be the case by default on the latest versions of Windows 10. If it's not, please refer to this page.
Creating a new key
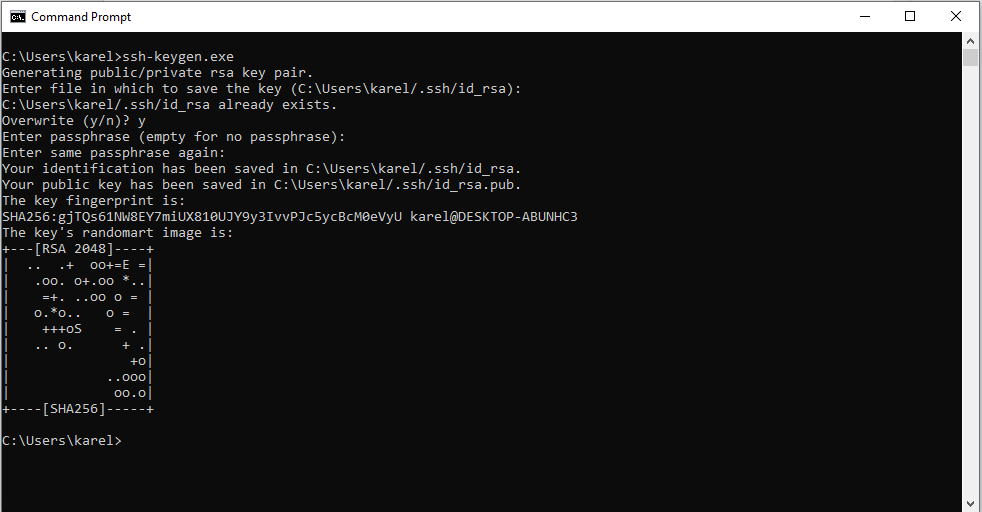
- Launch the command prompt.
- Type ssh-keygen.exe and press *Enter*.
- Press Enter again to save the key in the default file and folder (c:\Users\yourUsername\.ssh\id_rsa). I would advise against using another folder to store the key, as this might lead to permission issues. If you already have a key with the default name in that folder and you want to keep it, make sure to specify another file name (i.e. c:\Users\yourUsername\.ssh\id_rsa2).
- I would suggest to leave the passphrase empty. If you don't, you will be prompted to enter it every time you connect to the service. Just remember that you can add that extra layer of security if needed.
- Multiple confirmation messages will appear on your screen:
- "Your identification has been saved in c:\...": This is the location of your private key.
- "Your public key has been saved in c:\...": Obviously, this is the location of your public key.
- "The key fingerprint is: ..." and "The key's randomart image is ...": Just remember that both the fingerprint and the randomart image are simply a representation of your public key, making it easier to verify the authenticity of the server you are connecting to. Comparing the full key string, when in doubt, would be cumbersome.
Note: if you'd like to learn more about randomart, "The Drunken Bishop" is an excellent paper that will tell you all about it. Thanks to Aaron Toponce for summarizing and archiving it.
Adding the key to Github
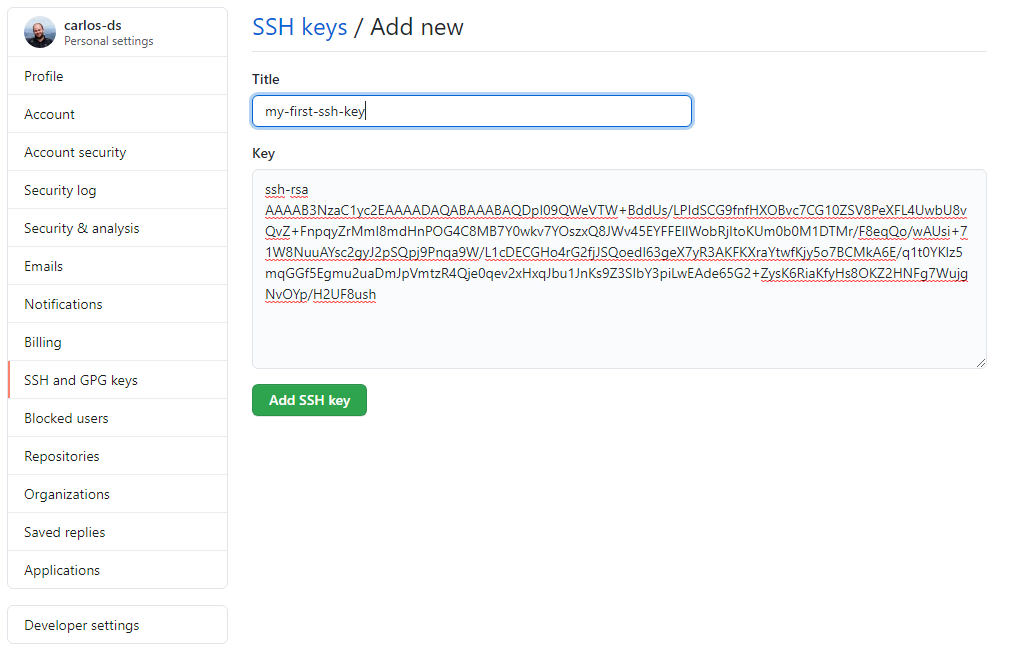
- Go to the folder containing your keypair (c:\Users\username\.ssh by default) and open the .pub file with a text editor.
- Copy the key but exclude the part after the final space (username@device-name).
- In Github, go to Settings -> SSH and GPG keys -> New SSH key
Testing it out
- When you're ready to test it out, make a commit on one of your local repositories and push the changes. Your terminal will state "The authenticity of host 'github.com (140.82.118.3)' can't be established. RSA key fingerprint is SHA256:[...]. Are you sure you want to continue connecting (yes/no/[fingerprint])?"
- Enter "yes" to add Github to known_hosts, a file which resides in the same folder as your key pair. As a best practice, when connecting to a new service (or more specifically: server) via SSH, you should first add the domain name or IP address to this file, together with the public key.
Congratulations! You can now securely connect to Github via SSH.
Remember!
- Never share your private key with anyone.
- Do not copy the key to another device. If you want to connect via SSH from another device, create a new key pair by following the same steps in this article.